SSH login for IoT devices has become a critical skill for modern tech enthusiasts, especially those working on Mac systems. Imagine this: you're sitting in your cozy home office, sipping coffee, and suddenly you need to access a remote IoT device miles away. With SSH, you can do just that, without breaking a sweat. But here's the catch—getting started with SSH on a Mac can seem daunting, especially if you're new to the world of networking and IoT. Don't worry, though! This guide will walk you through everything you need to know.
Now, let's break it down. SSH stands for Secure Shell, and it's basically a secure way to connect to another computer or device over the internet. When it comes to IoT devices, SSH is like your secret weapon for troubleshooting, managing configurations, or even downloading files from your Mac. It’s like having a remote control for all your gadgets, but way cooler.
Before we dive into the nitty-gritty, let me tell you something: mastering SSH isn't just about typing commands. It's about understanding how your devices communicate, ensuring security, and making sure everything runs smoothly. So, buckle up because we're about to take you on a journey that will transform you from a curious beginner to an SSH pro in no time!
Read also:Metul Shah Engaged The Inside Scoop Yoursquove Been Waiting For
Why SSH Login for IoT Devices Matters
Alright, let's get real here. IoT devices are everywhere—smart thermostats, security cameras, home assistants, you name it. And while these gadgets make our lives easier, they also come with challenges. One of the biggest challenges is managing them remotely. That's where SSH shines. By using SSH login, you can securely access your IoT devices from anywhere, as long as you have an internet connection.
But why should you care? Well, here's the deal. With SSH, you can:
- Remotely monitor and manage your IoT devices
- Download and transfer files securely
- Troubleshoot issues without being physically present
- Enhance the security of your network
And let's not forget, SSH is free and open-source, meaning you don't have to break the bank to use it. Plus, it works flawlessly on Mac, making it a no-brainer for Mac users who want to dive into the world of IoT.
Understanding SSH: The Basics
What Exactly is SSH?
Think of SSH as a secure tunnel that allows you to access another computer or device over the internet. Unlike other methods, SSH encrypts all data transmitted between your Mac and the IoT device, ensuring that no one can intercept your sensitive information. It's like having a private conversation in a crowded room—nobody else can hear what you're saying.
How SSH Works on Mac
Mac users are in luck because macOS comes with SSH pre-installed. That's right, no need to download or install anything extra. All you need is the Terminal app, which is already on your Mac. Simply open Terminal, type in a few commands, and voila! You're connected to your IoT device.
Here's a quick example of what the command might look like:
Read also:Masafunnet Your Ultimate Guide To Streaming Entertainment
ssh username@device_ip_address
Replace "username" with the actual username for your IoT device and "device_ip_address" with the IP address of the device. Easy peasy, right?
Setting Up SSH on Your Mac
Step 1: Enable SSH on Your IoT Device
Before you can SSH into an IoT device, you need to make sure SSH is enabled on that device. This process varies depending on the device, but most IoT devices have an option in their settings to enable SSH. Make sure to check the device's manual or manufacturer's website for specific instructions.
Step 2: Find Your Device's IP Address
Once SSH is enabled, you'll need to find the IP address of your IoT device. This can usually be done through your router's admin page or the device's settings menu. Knowing the IP address is crucial because it's what you'll use to connect to the device via SSH.
Step 3: Open Terminal on Your Mac
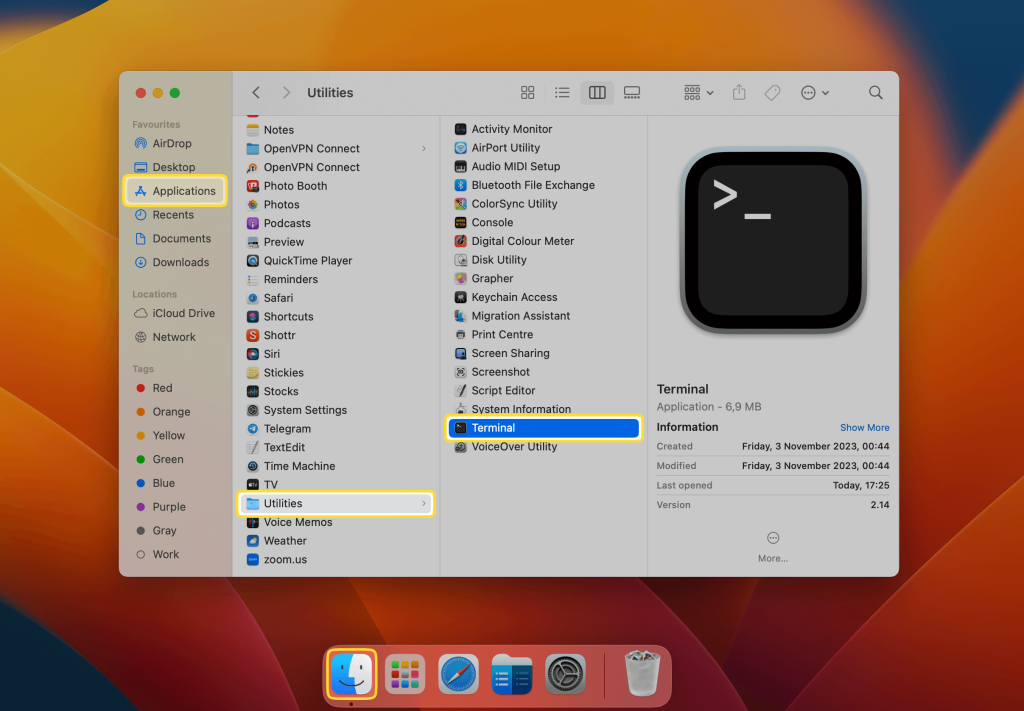
Now it's time to fire up Terminal. You can find it by searching for "Terminal" in Spotlight or navigating to Applications > Utilities > Terminal. Once Terminal is open, you're ready to start typing commands.
Connecting to Your IoT Device via SSH
Entering the SSH Command
With Terminal open, it's time to connect to your IoT device. Type the following command, replacing "username" and "device_ip_address" with the appropriate details:
ssh username@device_ip_address
Hit enter, and you'll be prompted to enter the password for the device. Once you enter the correct password, you'll be logged in and ready to start managing your IoT device.
Troubleshooting Common Issues
Let's face it—things don't always go smoothly. If you're having trouble connecting, here are a few common issues and how to fix them:
- Make sure SSH is enabled on the IoT device
- Double-check the IP address and username
- Ensure your Mac and the IoT device are on the same network
- Try restarting both devices if you're still having issues
Downloading Files from IoT Devices Using SSH
Using SCP for Secure File Transfers
One of the coolest things about SSH is its ability to securely transfer files between your Mac and IoT devices. This is done using a command called SCP (Secure Copy Protocol). Here's how it works:
To download a file from your IoT device to your Mac, use the following command:
scp username@device_ip_address:/path/to/file /path/to/local/directory
Replace "username" and "device_ip_address" with the appropriate details, and "/path/to/file" with the path to the file on the IoT device. "/path/to/local/directory" should be replaced with the path to the directory on your Mac where you want to save the file.
Uploading Files to IoT Devices
SCP isn't just for downloading files; it can also be used to upload files from your Mac to your IoT device. Here's the command for that:
scp /path/to/local/file username@device_ip_address:/path/to/remote/directory
Again, replace the placeholders with the appropriate details, and you're good to go!
Enhancing Security with SSH Keys
What Are SSH Keys?
SSH keys are like digital keys that allow you to securely access your IoT devices without needing a password. They're way more secure than traditional passwords and make logging in faster and easier. Plus, they add an extra layer of security to your network.
Generating SSH Keys on Mac
To generate SSH keys on your Mac, open Terminal and type the following command:
ssh-keygen -t rsa -b 4096 -C "your_email@example.com"
Replace "your_email@example.com" with your actual email address. Follow the prompts to create your keys, and you'll be all set!
Adding SSH Keys to Your IoT Device
Once you've generated your SSH keys, you'll need to add the public key to your IoT device. This is done by copying the public key to the device using the following command:
ssh-copy-id username@device_ip_address
Again, replace "username" and "device_ip_address" with the appropriate details. After running this command, you should be able to log in to your IoT device without needing a password.
Best Practices for SSH Login
Use Strong Passwords
Even if you're using SSH keys, it's still a good idea to use strong passwords for your IoT devices. A strong password should be at least 12 characters long and include a mix of uppercase and lowercase letters, numbers, and symbols.
Keep Your Software Up to Date
Security vulnerabilities are discovered all the time, so it's important to keep your Mac and IoT devices up to date with the latest software updates. These updates often include important security patches that can protect your devices from hackers.
Monitor Your Connections
Regularly check your SSH connections to ensure that no unauthorized access has occurred. Most IoT devices have logs that you can review to see who has connected to the device and when.
Advanced SSH Techniques
Port Forwarding
Port forwarding allows you to access your IoT devices from outside your local network. This is especially useful if you want to manage your devices while you're away from home. However, be cautious when using port forwarding, as it can expose your devices to the internet and increase the risk of attacks.
SSH Tunneling
SSH tunneling is a technique that allows you to securely access services on your IoT devices that aren't normally accessible over the internet. This can be useful for things like accessing a web interface or database on the device.
Conclusion: Take Your IoT Game to the Next Level
There you have it—a comprehensive guide to mastering SSH login for IoT devices on your Mac. By following the steps outlined in this article, you can securely access and manage your IoT devices from anywhere, download files, and even enhance the security of your network.
So, what are you waiting for? It's time to put your new skills to the test! Try connecting to one of your IoT devices using SSH and see how easy it is. And don't forget to leave a comment below or share this article with your friends if you found it helpful. Happy SSH-ing!
Table of Contents